Thursday, February 22, 2018

Speed Calibration Tests

We suspected that our head speeds on both the 2 inch and 4 inch focal length laser were slower by about a factor of 2 versus the parameters settings indicated in software. However, after running cut and etch tests on wood using Boss Laser standardized test files, we found agreement between the Boss Laser and Build RVA timings of within several percent. Therefore, I attribute our initial concerns to a bias prompted by the very ambitious simulation times indicated in the Preview feature of RDWorks.

The standardized laser  cut and engraving test files are found here.


 Engraving on Wood

Seth also proved us some practical guidance regarding setting up parameters for working with wood.

1. In the "Cut Optimize Handle" menu, engage the check boxes for (a) ordering, (b) working inside to outside and (c) auto determine. Set your height to 600 in an up to bottom configuration.

2. You can obtain the best results by scanning/engraving perpendicular to the wood grain.

3. Good choices of wood for working with the laser are Cherry and Alder.


Thursday, February 15, 2018

Optimizing Grayscale Images for Glass Etching


A multicolored bird is difficult to prepare because:

 (a) The combination of dark (black head) and light (pale yellow tail feathers) colors makes it mathematically more challenging to represent the full color range with just a single 8-bit color plane after posterizing. 

(b) The bird has a variety of shades even within a base color.

(c) The intricate detail and complex shapes of a biological subject pose challenges with respect to boundaries.

The main variables to change in Gimp are:

Brightness: decrease it to give faint areas a chance to etch.

Contrast: increase it to help with boundaries and offset the lower brightness so that you have a true zero for the white background (no etch) around the bird.

Number of posterizing levels:  a trade off between good boundaries and smooth color shade transitions.

The main variables to change in RDWorks are:

% power: a trade off between etching all the colors and losing detail.

Scan gap interval: a trade off of run time versus quality. Scan gaps on rotated media need to be a factor of 3 to 8 smaller than for flat media.

Speed: a 3 way trade off between waiting a long time for the etch to complete, the depth of the etch and the etch quality.

Warning: Make sure to change any brightness and contrast settings in Gimp BEFORE posterizing.

I will set up four g-code .rd files for permutations of 13% vs 17% power against 0.008 mm and 0.016 mm scan gap intervals running the 2 inch focal length laser on a cylindrical 7 inch drinking glass. I chose these parameters based a 2 hours worth of trial and see test cases on Gimp and RDworks simulations.

Finally, The gimp posterization process was independently verified in Octave, a shareware scientific and numerical programming development environment that can dissect image files down to the basic byte color values in all dimensions. For example, posterizing a gray scale image of values from 0 to 255 yields 6 levels at roughly evenly spaced gray colors of 0, 51, 102, 153, 204, and 255.


Tuesday, February 13, 2018

Etching Flat Glass

Seth and I I etched flat glass with a thickness of 3/32 inch using the 4 inch focal length laser at 20% power.  Our scan gaps were 10 one-thousands to 15/1000 mm and our nominal speed was 400 mm per second with laser frequency 10 kilohertz.

Operationally however, we observed that the laser head speed is more in the 150-175 mm per second range.  We are working with Boss Laser to try and troubleshoot the drop in speed vs. what is indicated in software and what is displayed in the on-board laser control screen.  This costs us wall clock time and is also affecting the quality of the work when the head is moving too slowly.


We also used wet newspaper to improve the quality of the thin segments of the design.  This is a clue that we learned from Boss Laser from their website in terms of optimizing results on glass.  We found because of the dry conditions and the strong air flow in the chamber that we needed to pause this scan several times so that we could take a wet brush and refresh the newspaper, as it was trying out quickly.

See this link for tips and tricks for etching glass:

You can go to this web page for Boss Laser suggested parameters for a variety of materials:


See this album for photos and videos of etching our glass

Warning: do not attempt to cut glass using the laser!  The glass simply cannot absorb that much heat in a short period of time and the result is that you'll have fractured and cracked glass with many splinters to clean up in the laser chamber.

Based on experience, we determined that will need to purchase some basic tools and supplies to help us while working with glass:

Toothbrushes
Eye droppers
Baking soda
Newspaper
Regular cleaning brushes

Rotary Roller Particulars


Considerable effort was required to align the Roller's straight bar with the bed, as it was to get the motorized and free spinning wheels to be in the same horizontal plane. i/e. changing their Z axis position relative to the laser chamber bed (the Roller apparatus has spin knobs to do this).  Careful work is also required to get the center of the cylindrical drinking vessel aligned and centered on the laser head position; this is best done while standing at the side of the laser and looking in the Y direction (the same direction as the gantry).

Depending on the rim and base shapes of your drinking vessel, you also want to remember to give clearance between the rim and/or base of the vessel to avoid touching against the wheel base on the other side so they don't scrape the wheels of the vessel while it is turning.

Be aware that there is a rotational equivalent to hitting the Y stop limits within your chamber bed; you can only do so many rotations in either the clockwise are counterclockwise direction before the roller becomes unresponsive and its position does not change. This will also result in tests activated by the software that do not rotate the wheels.  You'll get some clues that you are at your limit point if you see an error message on the view port for the on-board laser control panel that you have "Y slop over" error:


Also see this link for more details on error messages on the Boss Laser's LCD panel related to using the Rotary Roller


When everything is working well, here is an example of the intricate artwork you can engrave into a tall drinking glass (the bird is 5 inches tall):


When you try to frame your design and you'll also see that it is unrealistically narrow in the one direction.  If you find yourself near such a limit, just manually move away (either within software or using the on-board arrow keys) a number of steps to clear open Y space so you can properly frame your design.

While working in rotation mode you will likely need to drop your scan gap interval by a factor of three to eight lower than working on flat materials. For example whereas a scan gap of 0.067 mm is good for flat materials, your likely should set a scan gap closer to 0.015 mm while in rotation mode.

Click here to see more photos and videos of the Rotary roller apparatus in action


Precise Wood Cutting

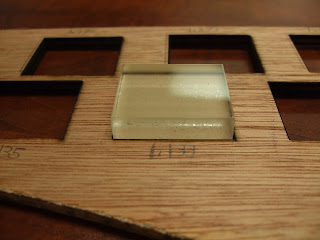
I ran a set of 10 block cuts at 20% power and 15 mm per second speed on the 4 inch laser, with block dimensions set to the 1/1000 inch.  The two small stocks did not cut all the way through on one corner.  I attribute this to either a local warping in the board or an anomaly in the wood grain or density of the wood.  With the exception of the block of dimension at 1.135 inches by 1.40 inches, 1.133 inches by 1.40 inches,, and 1.373 by 1.15 inches all of the openings accommodated the nominal 1.40 inch by 1.15 inch Plexiglas block with little to no resistance.  The test stock was able to push all the way through.  The variations in length across a series of blocks cut into the wood were in intervals of 2/1000 inch.

Use painters tape wrapped around your finger to lift cutout blocks from the board without lifting or moving the board, or having the block fall through to the debris catch pan.


The conclusion is that the 4 inch a laser cannot be trusted to precisely differentiate cut lines at precisions at 2/1000  inch.  However based on the prior tests earlier in January, the 4 inch laser certainly can be trusted to cut lines as good as one-100th of an inch. These findings appear to be true in both the X and while Y directions of the laser chamber.  The cut-off mark between true precision and lack of precision for the 4 inch laser under these operating conditions is somewhere between 9/1000th and 3/1000th of an inch. See the photos below and also this wood cut album for more examples with captions.


incomplete cuts due to wood anomalies


opening is too small


Monday, February 5, 2018

Seth and I used the Rotary Roller tool on the 2 inch focal length Boss Laser to shallow etch designs into two glass drinking vessels. You must be connected directly to the laser with your computer to use the Rotary Roller. Here is a video of the Rotary roller in action plus a photo of a Cedar Waxwing bird etched into a 7 inch drinking glass.